

This documentation provides all the details you need to use the DreamsAI theme, understand how DreamsAI is structured, and perform the most common tasks. If you require further assistance on topics not covered in this documentation, please contact us via our support forum.
We assume that you already have WordPress installed and ready to use. If you do not, please see the WordPress Instructions section below to help you get started.
To use this theme you need a working version of WordPress already installed on your server or the local environment. We have given the documentation links, where you will find the requirements and the other details about WordPress.
- WordPress Before Install – general info before you install WordPress.
- WordPress Requirements – general info for WordPress requirements.
- href="https://wordpress.org/support/article/how-to-install-wordpress/">WordPress Installation – general info about WordPress and installation instructions.
- WordPress Lessons – general lessons for WordPress.
To use the DreamsAI WP theme you need the latest version of WordPress, PHP Version 7 or higher, and MySQL 5 or higher. Apart from the necessary WordPress requirements here are listed recommended server configuration requirements to make the theme work properly.
- PHP – Version 7.4 or higher
- MySQL – Version 5.6 or higher ( OR MariaDB version 10.1 or higher)
- memory_limit – 512M or higher
- max_execution_time – 300 or higher
- upload_max_filesize – 256M or higher
We assume that your WordPress website is already set up. The next step is to install the theme. To get started, download the full package from your Envato / ThemeForest Downloads page and locate the DreamsAI theme.
The downloaded package contains:
- DreamsAI.zip – the installable parent theme file
- DreamsAI-child.zip – the child theme (use this for all customisations)
- documentation/ – this documentation
The DreamsAI and DreamsAI Elemontor plugins are bundled
inside the theme at
DreamsAI/inc/tgm-activation-plugin/. They are
registered
and installed automatically via the TGM Plugin
Activation library. You do not need to
upload these plugins manually — WordPress will prompt you to install
them as required plugins immediately after you activate the theme.
There are two ways to install the theme in your WordPress environment:
FTP Client:
You can use an FTP client (e.g., FileZilla) to upload the theme and plugins directly to your server.
Through WordPress Admin:
You can install it directly using the WordPress theme upload interface (recommended for most users).
Step 1:
Log into your web server with FTP client software (e.g., FileZilla).
Step 2:
Unzip the downloaded package. Locate DreamsAI.zip inside the package and unzip it to get the DreamsAI theme folder.
Step 3:
Upload the extracted DreamsAI theme folder to
wp-content/themes/ on your server.
Step 4:
Activate the theme. Go to Appearance → Themes and click Activate on DreamsAI.
Step 5 – Install bundled plugins via FTP:
The downloaded package includes a
/DreamsAI/inc/tgm-plugin-activation/ folder
containing the DreamsAI and DreamsAI
Widgets plugin ZIPs. Unzip each and upload the
extracted plugin folders to wp-content/plugins/. Then
activate each plugin via Plugins → Installed
Plugins in WordPress Admin.
Before you start importing the demo content, make sure you have installed all the required plugins so that the demo content imports properly. Install and activate each plugin one at a time in the order listed below.
Note: Install & Activate plugins one by one in the order shown.
| Plugin Name | Source | Version Tested | Free / Premium |
|---|---|---|---|
| DreamsAI | Bundled inside theme — auto-prompted via TGM
Plugin Activation
(inc/tgm-activation-plugin/) |
1.0 | Bundled with theme |
| DreamsAI Widgets | Bundled inside theme — auto-prompted via TGM
Plugin Activation
(inc/tgm-activation-plugin/) |
1.0 | Bundled with theme |
| Dreams Theme Option Framework | Bundled inside theme — auto-prompted via TGM
Plugin Activation
(inc/tgm-activation-plugin/) |
1.0 | Bundled with theme |
| WooCommerce | WordPress.org | 8.x | Free |
| Elementor | WordPress.org | 3.x | Free |
| One Click Demo Import | WordPress.org | 3.x | Free |
| Contact Form 7 | WordPress.org | 5.x | Free |
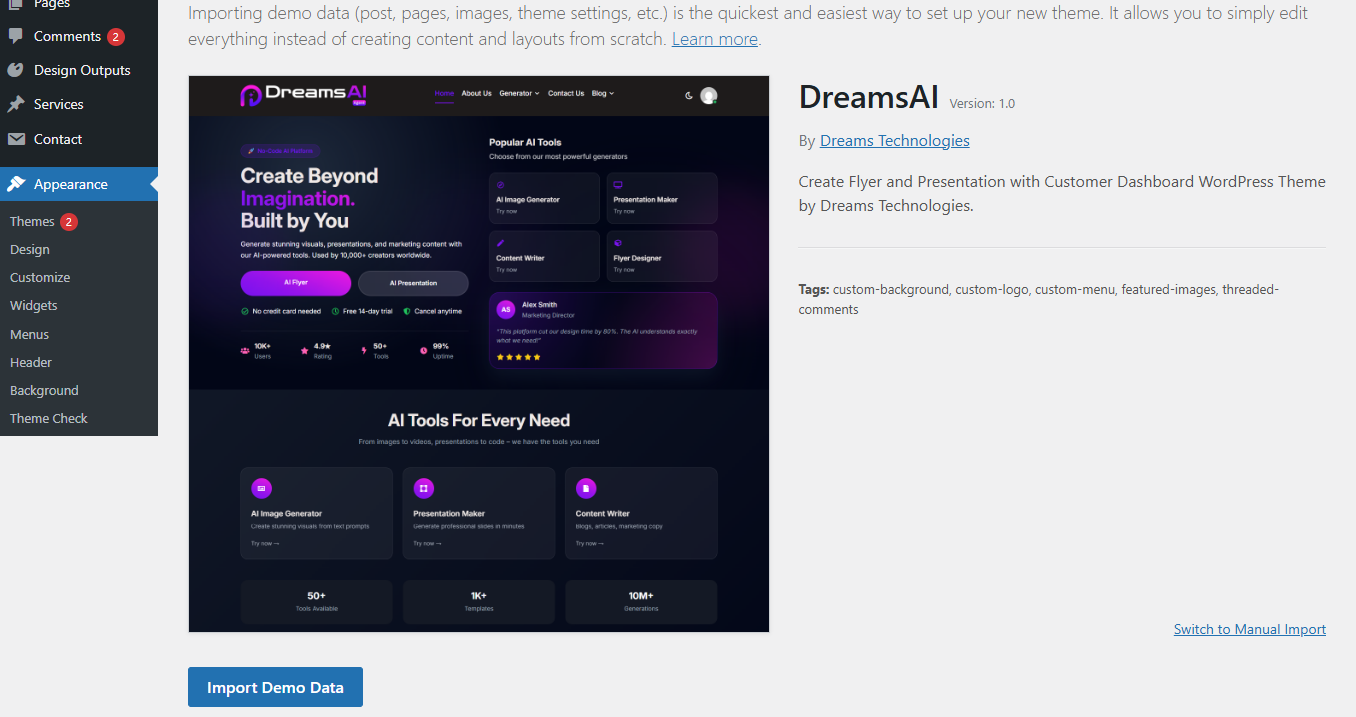
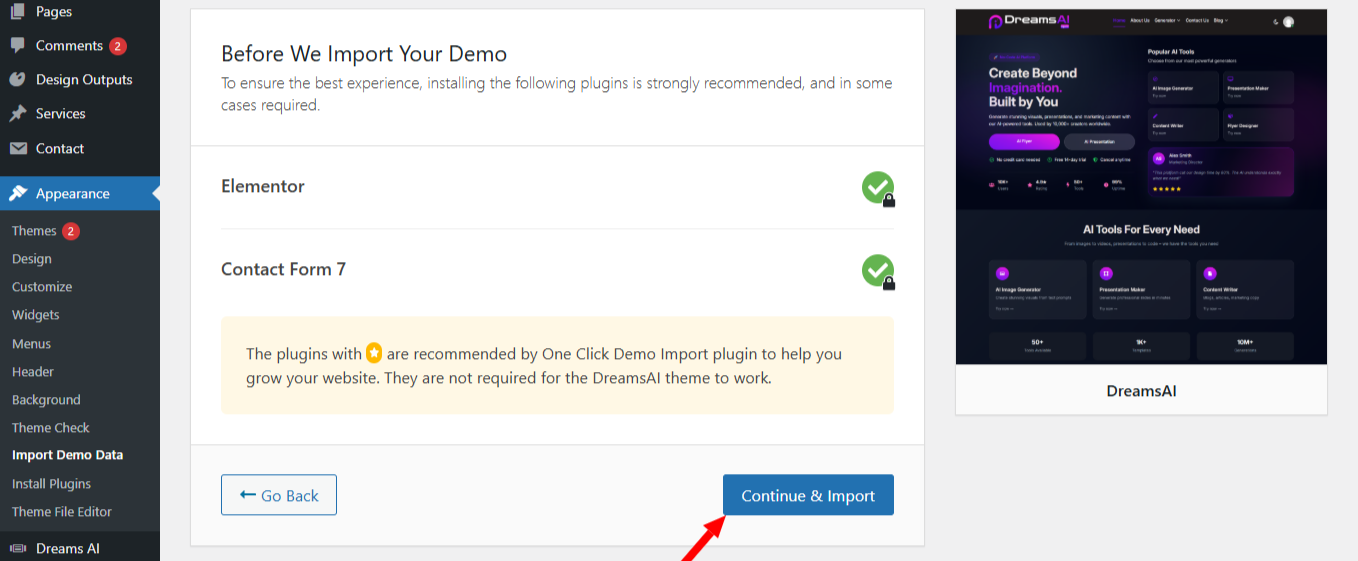
To import the demo, go to Appearance → Import Demo Data. Click Import Demo Data, then click the Import Demo button and wait a few minutes for the process to complete.
After importing the demo content, go to Elementor → Settings → Features Tab → Inline Font Icons and change the setting from DEFAULT to INACTIVE. This is required for icons to render correctly.
If the demo import times out or shows a white screen, try the following:
- Add
define( 'WP_MEMORY_LIMIT', '512M' );to yourwp-config.phpfile. - Ask your host to set
max_execution_timeto 300 or higher. - Re-run the import from Appearance → Import Demo Data.
- If images are missing after import, go to Tools → Import and re-run the media import.
The downloaded package is organised as follows. All custom modifications should be made in the DreamsAI-child theme — never edit the parent theme files directly, as they will be overwritten on update.
DreamsAI-package/
├── DreamsAI.zip            ← Installable parent theme
├── DreamsAI-child.zip      ← Installable child theme (use for all customisations)
└── documentation/ ← This documentationThe DreamsAI and DreamsAI
Elementor plugins are bundled inside the theme at
DreamsAI/inc/tgm-activation-plugin/. There is no separate
plugins folder in the download package. After you activate the theme,
WordPress will automatically display a prompt to install these required
plugins via the TGM Plugin Activation library.
Never modify files inside the DreamsAI/ parent
theme folder directly. Always use the DreamsAI-child
theme or WordPress hooks/filters for customisations.
A child theme is required for any customisations you want to survive theme updates. The download package includes a pre-built child theme — DreamsAI-child.zip — which you should install and activate instead of modifying the parent theme directly.
Installing the Child Theme
- Go to Appearance → Themes → Add New → Upload Theme.
- Upload
DreamsAI-child.zipand click Install Now. - Click Activate. The parent DreamsAI theme must also be installed (but does not need to be active).
Child Theme functions.php — Minimum Setup
The child theme's functions.php correctly enqueues the parent theme
styles. The essential code is:
<?php
/**
 * DreamsAI Child Theme functions.php
 */
add_action( 'wp_enqueue_scripts', 'DreamsAI_child_enqueue_styles' );
function DreamsAI_child_enqueue_styles() {
    wp_enqueue_style(
        'DreamsAI-parent-style',
        get_template_directory_uri() . '/style.css'
    );
    wp_enqueue_style(
        'DreamsAI-child-style',
        get_stylesheet_uri(),
        array( 'DreamsAI-parent-style' )
    );
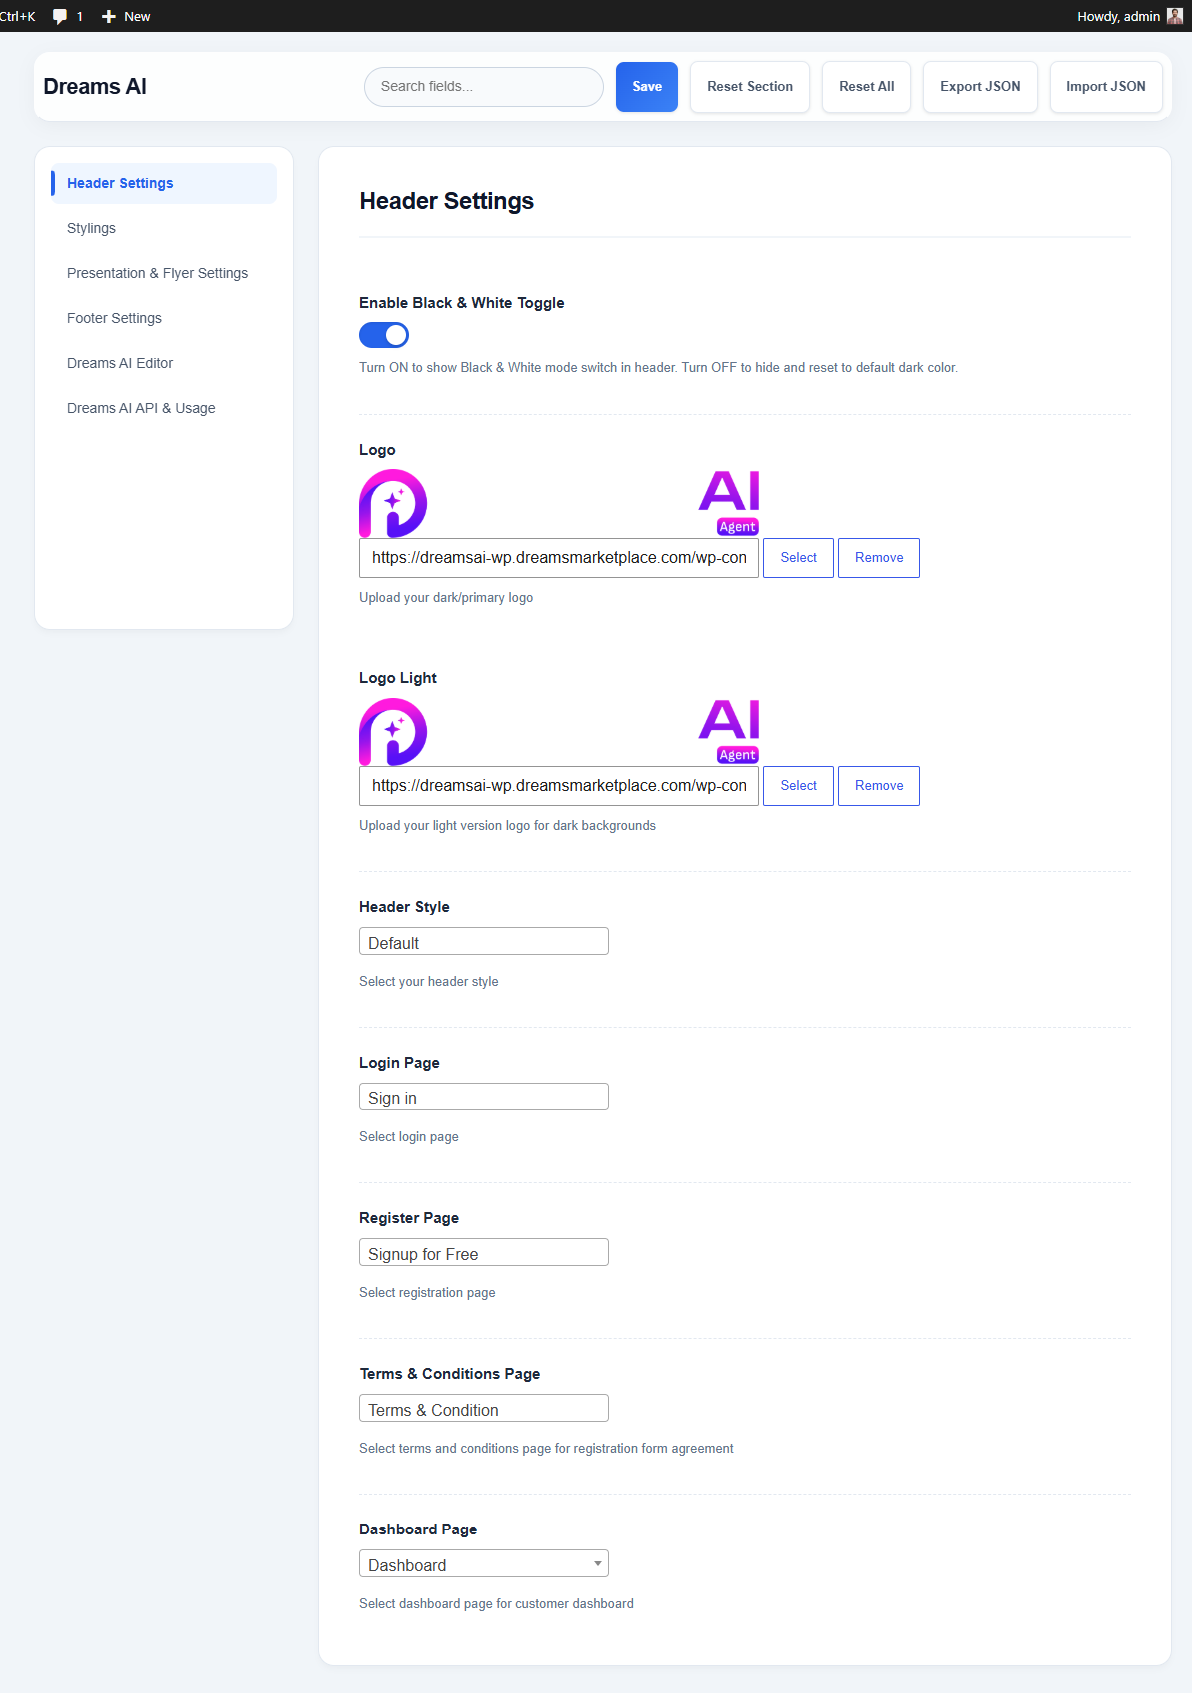
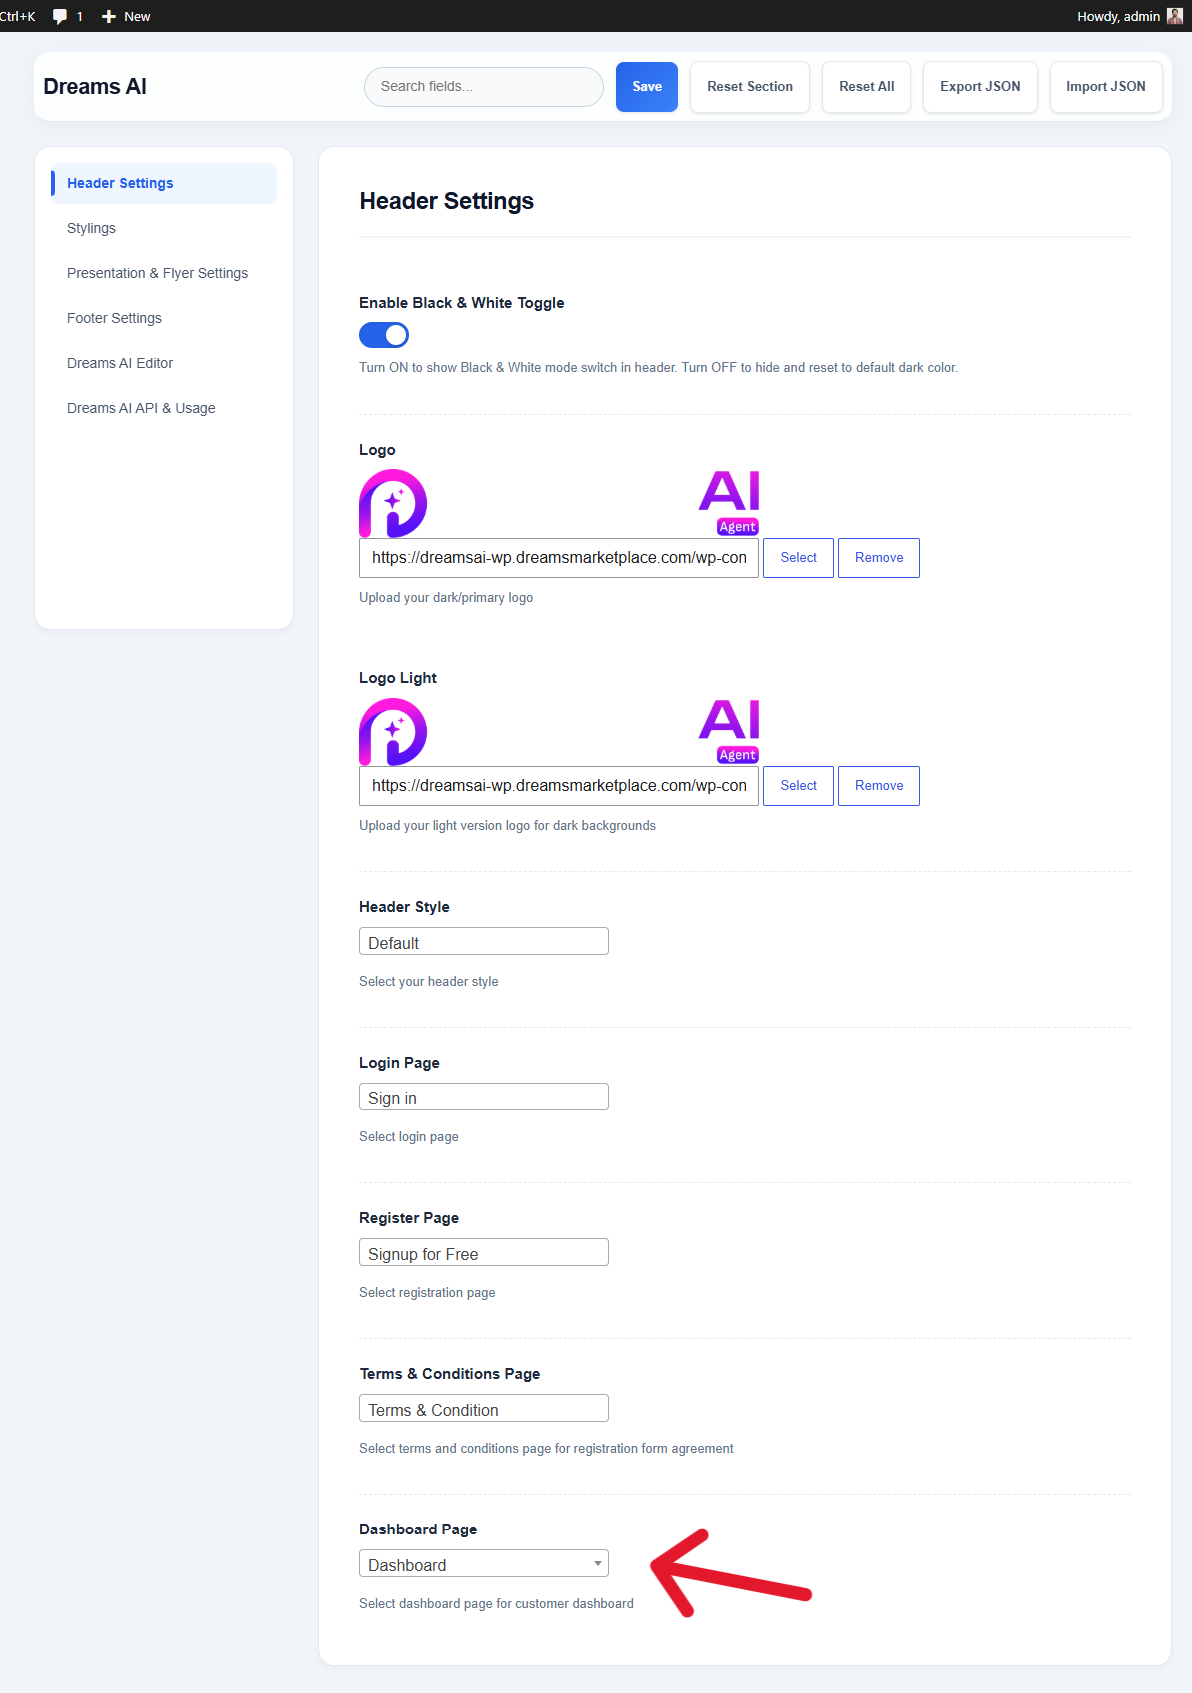
}Configure primary logos, header styles, and essential navigation page assignments.
- Logo: Upload your primary/dark version logo.
- Logo Light: Upload your light version logo for dark background headers.
- Header Style: Select default header layout style.
- Login Page: Select the designated Sign In page.
- Register Page: Select the designated Signup for Free page.
- Terms & Conditions Page: Select terms & conditions agreement page for user registration.
- Dashboard Page: Select the customer dashboard page.
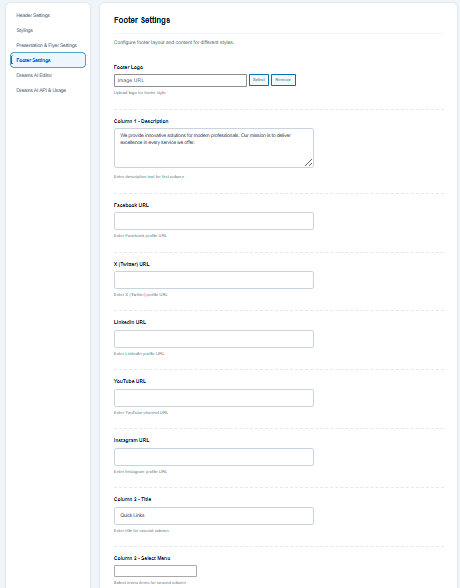
Configure footer layout, custom brand description, social links, and footer column menus.
- Footer Logo: Enter the image URL for the footer logo, then use the Select / Remove buttons to manage it.
- Column 1 - Description: Enter custom company description text for column 1 (e.g. "We provide innovative solutions for modern professionals. Our mission is to deliver excellence in every service we offer.").
- Social Profile URLs: Enter URLs for Facebook, X (Twitter), LinkedIn, YouTube, and Instagram — any field left blank simply hides that icon.
- Column 2 Title & Menu: Set the section title (default: Quick Links) and select which WordPress menu to display in that column.
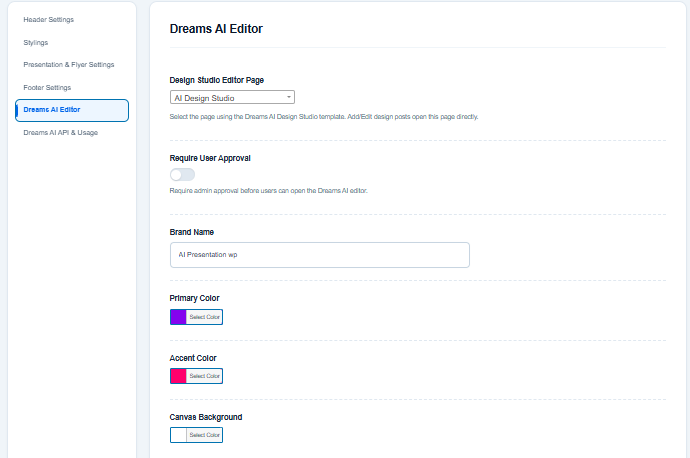
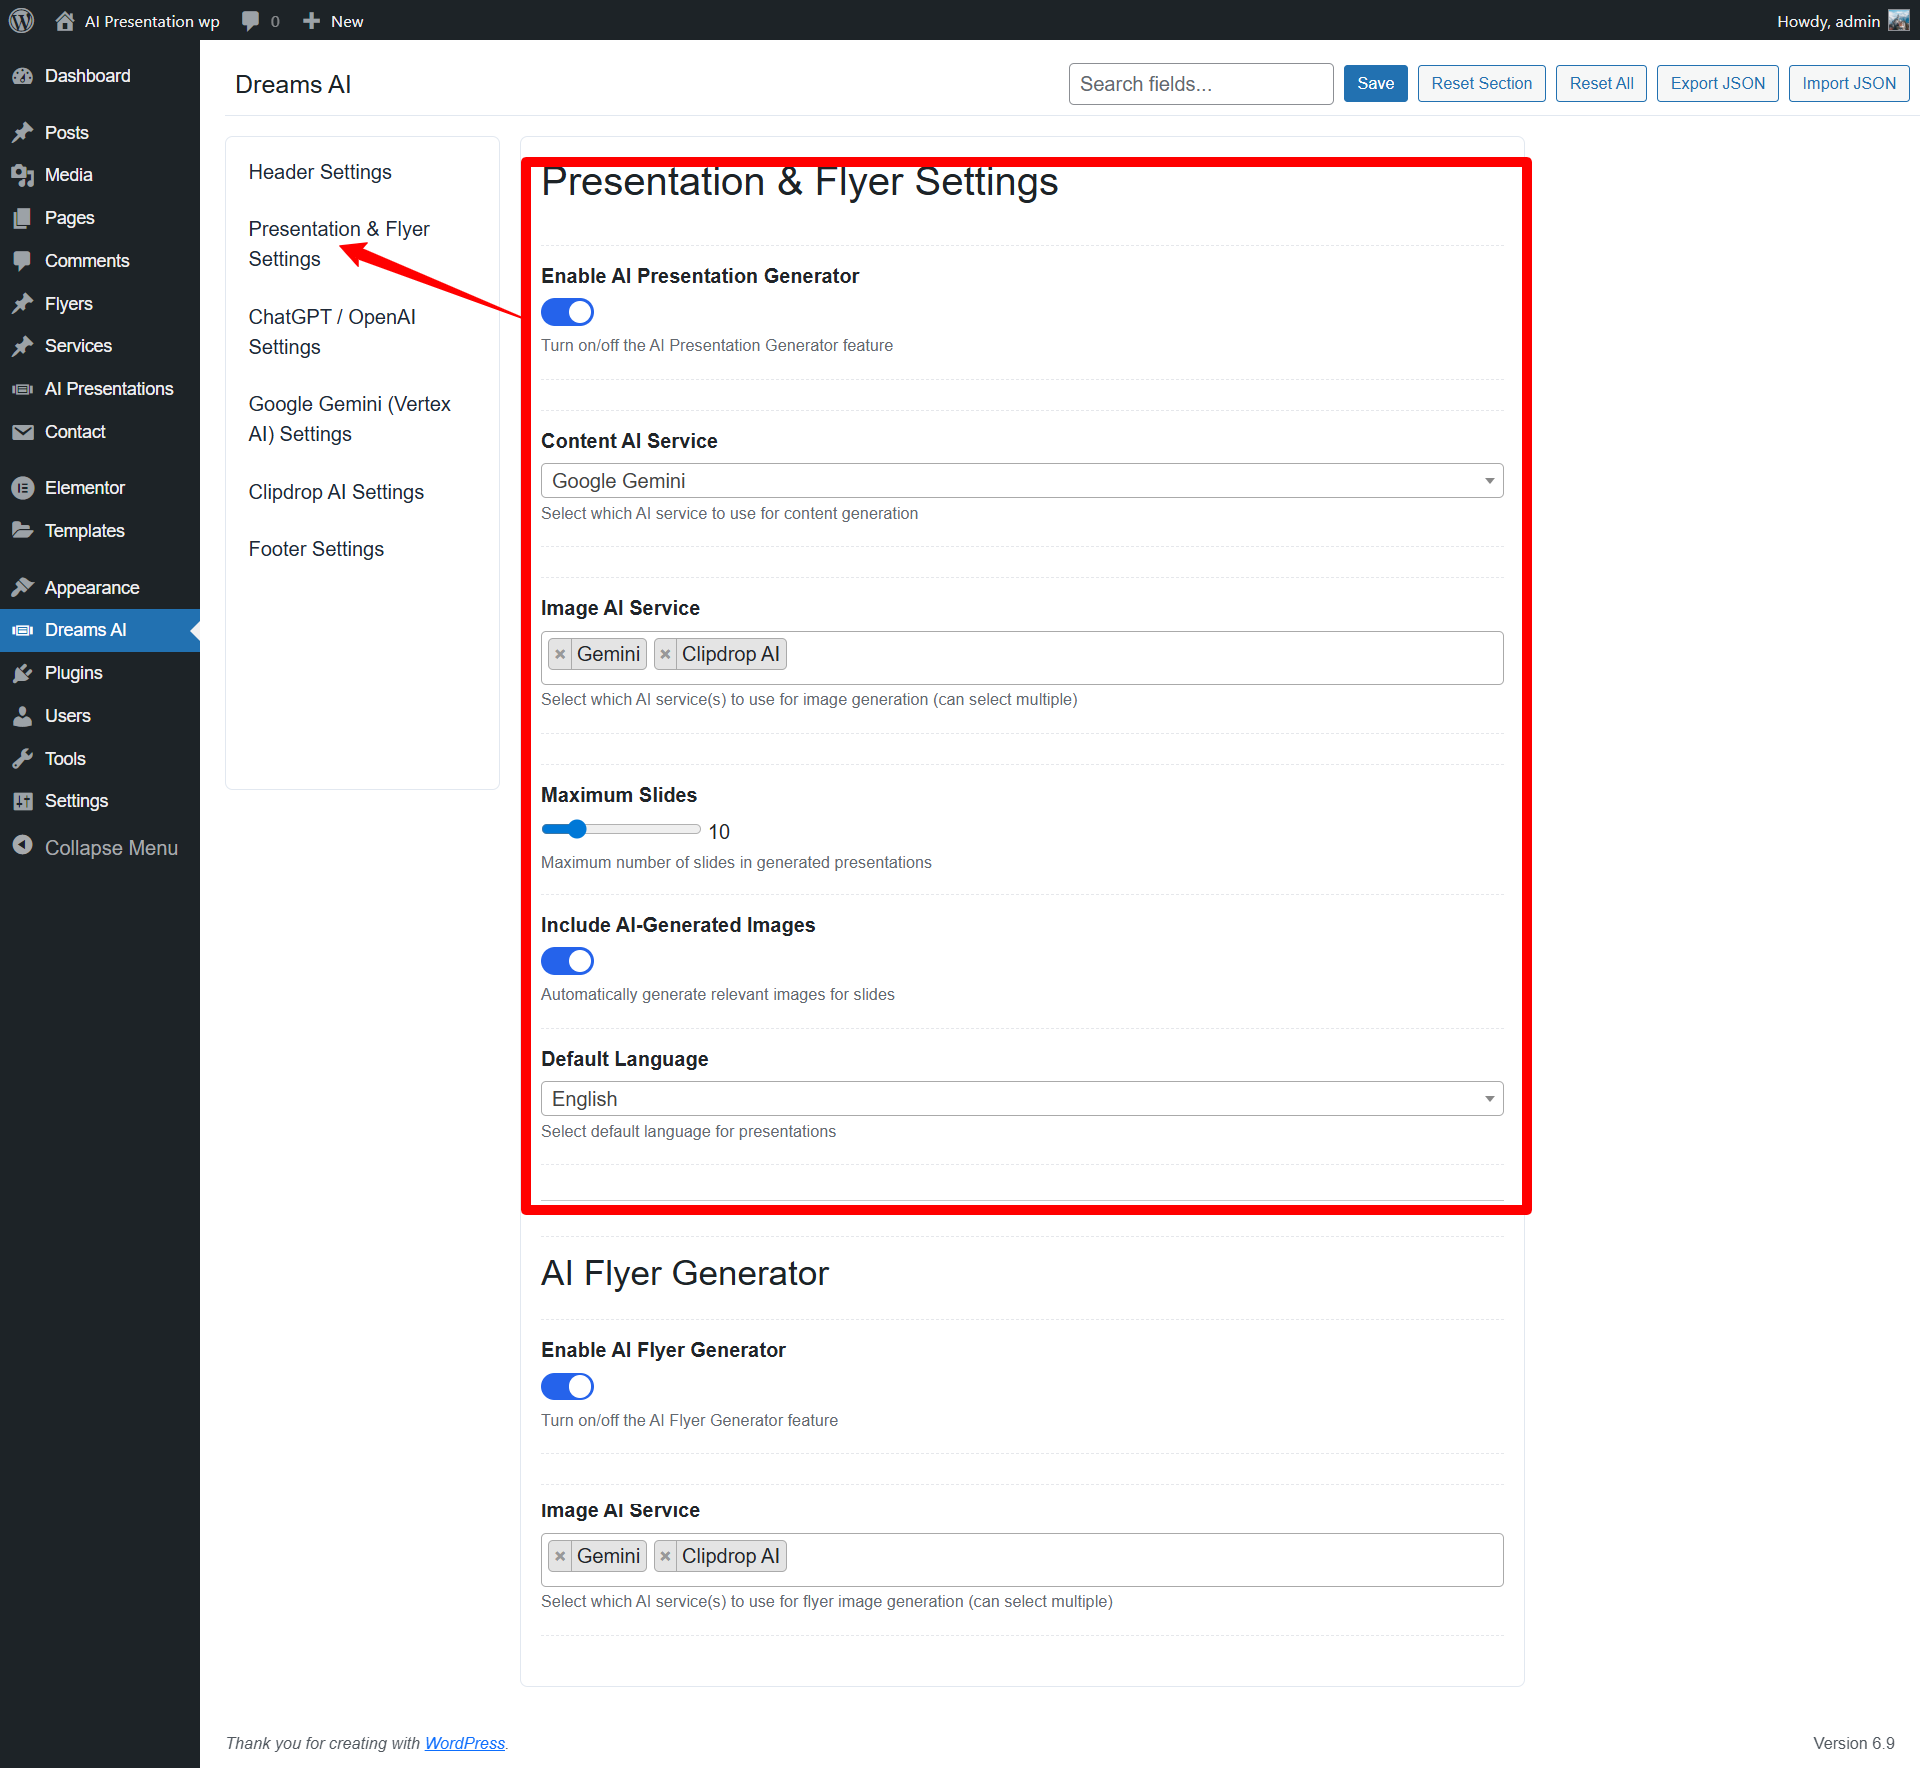
Configure options for the DreamsAI Design Studio and canvas editor.
- Design Studio Editor Page: Select the page using the AI Design Studio template — Add/Edit design posts open this page directly.
- Require User Approval: Toggle admin approval requirement before users can access the editor.
- Brand Name: Specify custom brand name displayed inside the editor (e.g. AI Presentation wp).
- Primary & Accent Colors: Custom color pickers for primary UI and accent highlight buttons.
- Canvas Background: Set default canvas background color for presentation designs.
- Content AI Service: Dropdown to choose which AI engine writes the slide text/outline — ChatGPT / OpenAI or Google Gemini. Whichever service is selected here must have its API credentials entered under DreamsAI API & Usage.
- Image AI Service: Multi-select field for the engine(s) used to generate slide images — Gemini and Clipdrop AI can both be selected at once, and the theme will fall back between them.
- Maximum Slides: Slider that caps the number of
slides a generated presentation can contain (default:
10, range 3–12 on the front-end generator). - Include AI-Generated Images: Toggle switch — when on, the generator automatically creates matching images for each slide; when off, slides are text-only.
- Default Language: Dropdown for the language used
when generating presentation content (default:
English; 8+ languages supported on the front-end generator).
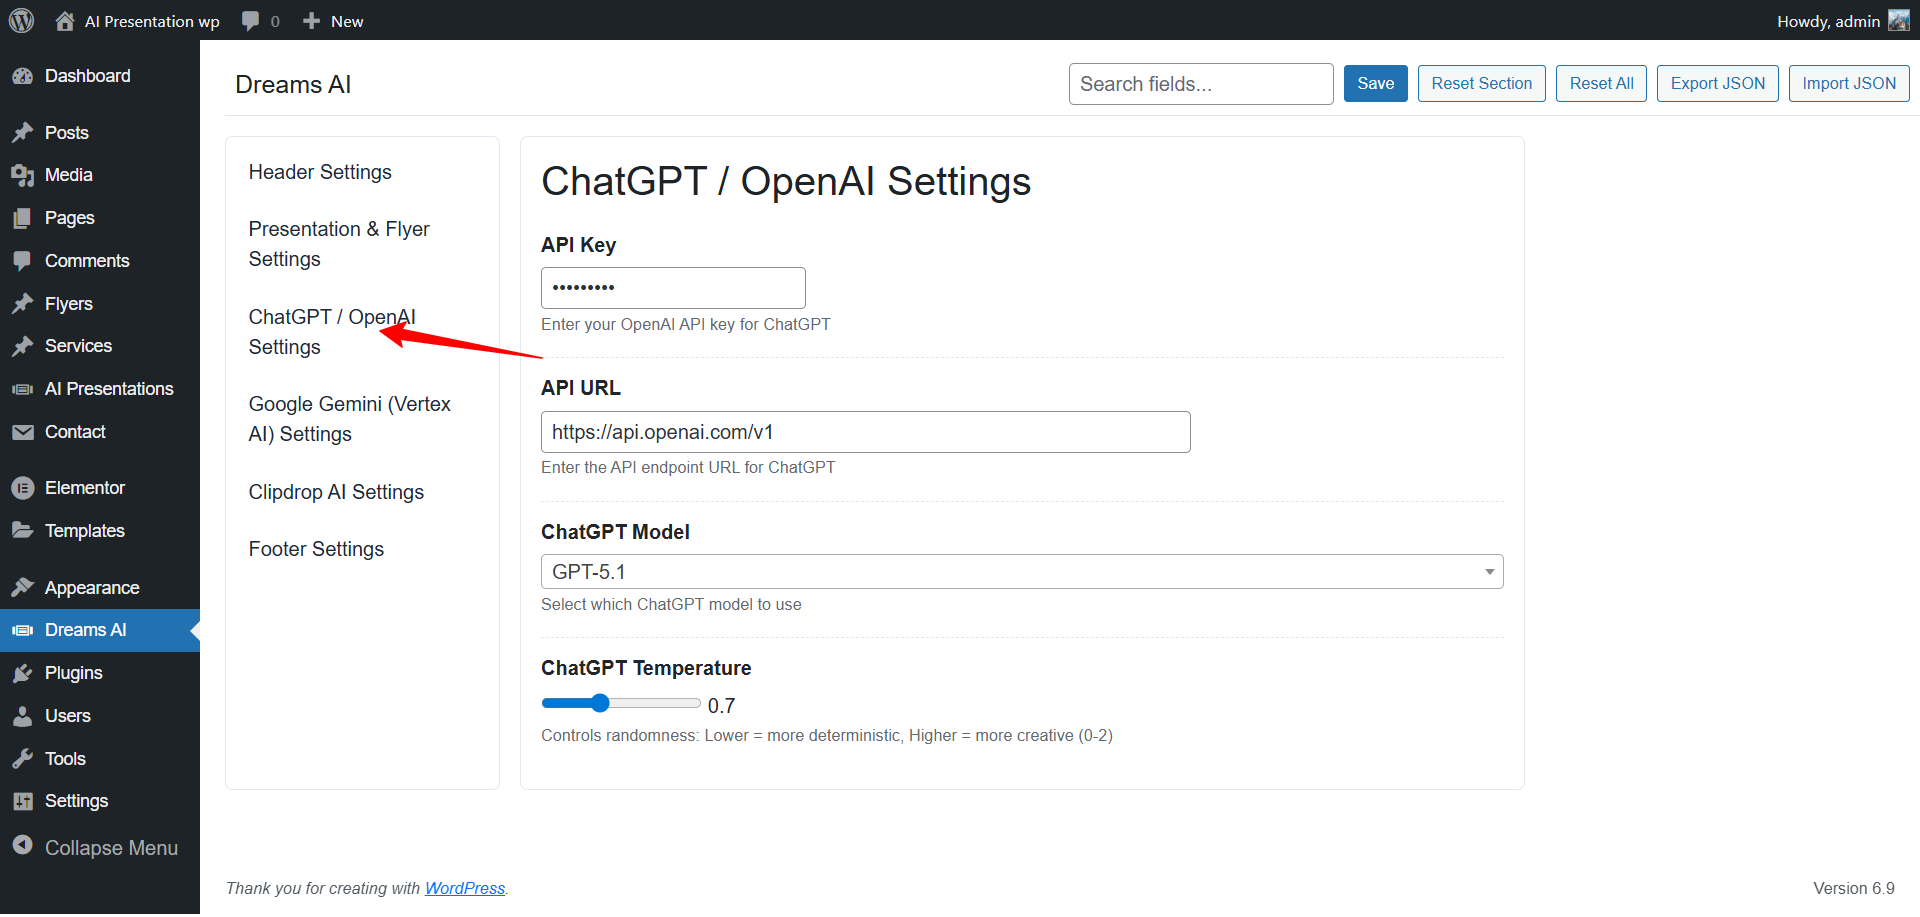
Configure API keys and usage credentials for OpenAI, Gemini, Clipdrop, and other supported AI services. Each service has its own settings tab under DreamsAI in the WordPress admin menu, alongside Header Settings, Presentation & Flyer Settings, and Footer Settings.
ChatGPT / OpenAI Settings
- API Key: Your OpenAI API key, used to authenticate requests.
- API URL: The API endpoint for ChatGPT (default:
https://api.openai.com/v1). - ChatGPT Model: Dropdown to select which model to
use for content generation (e.g.
GPT-5.1). - ChatGPT Temperature: Slider controlling response
randomness — lower is more deterministic, higher is more creative
(range 0–2, default
0.7).
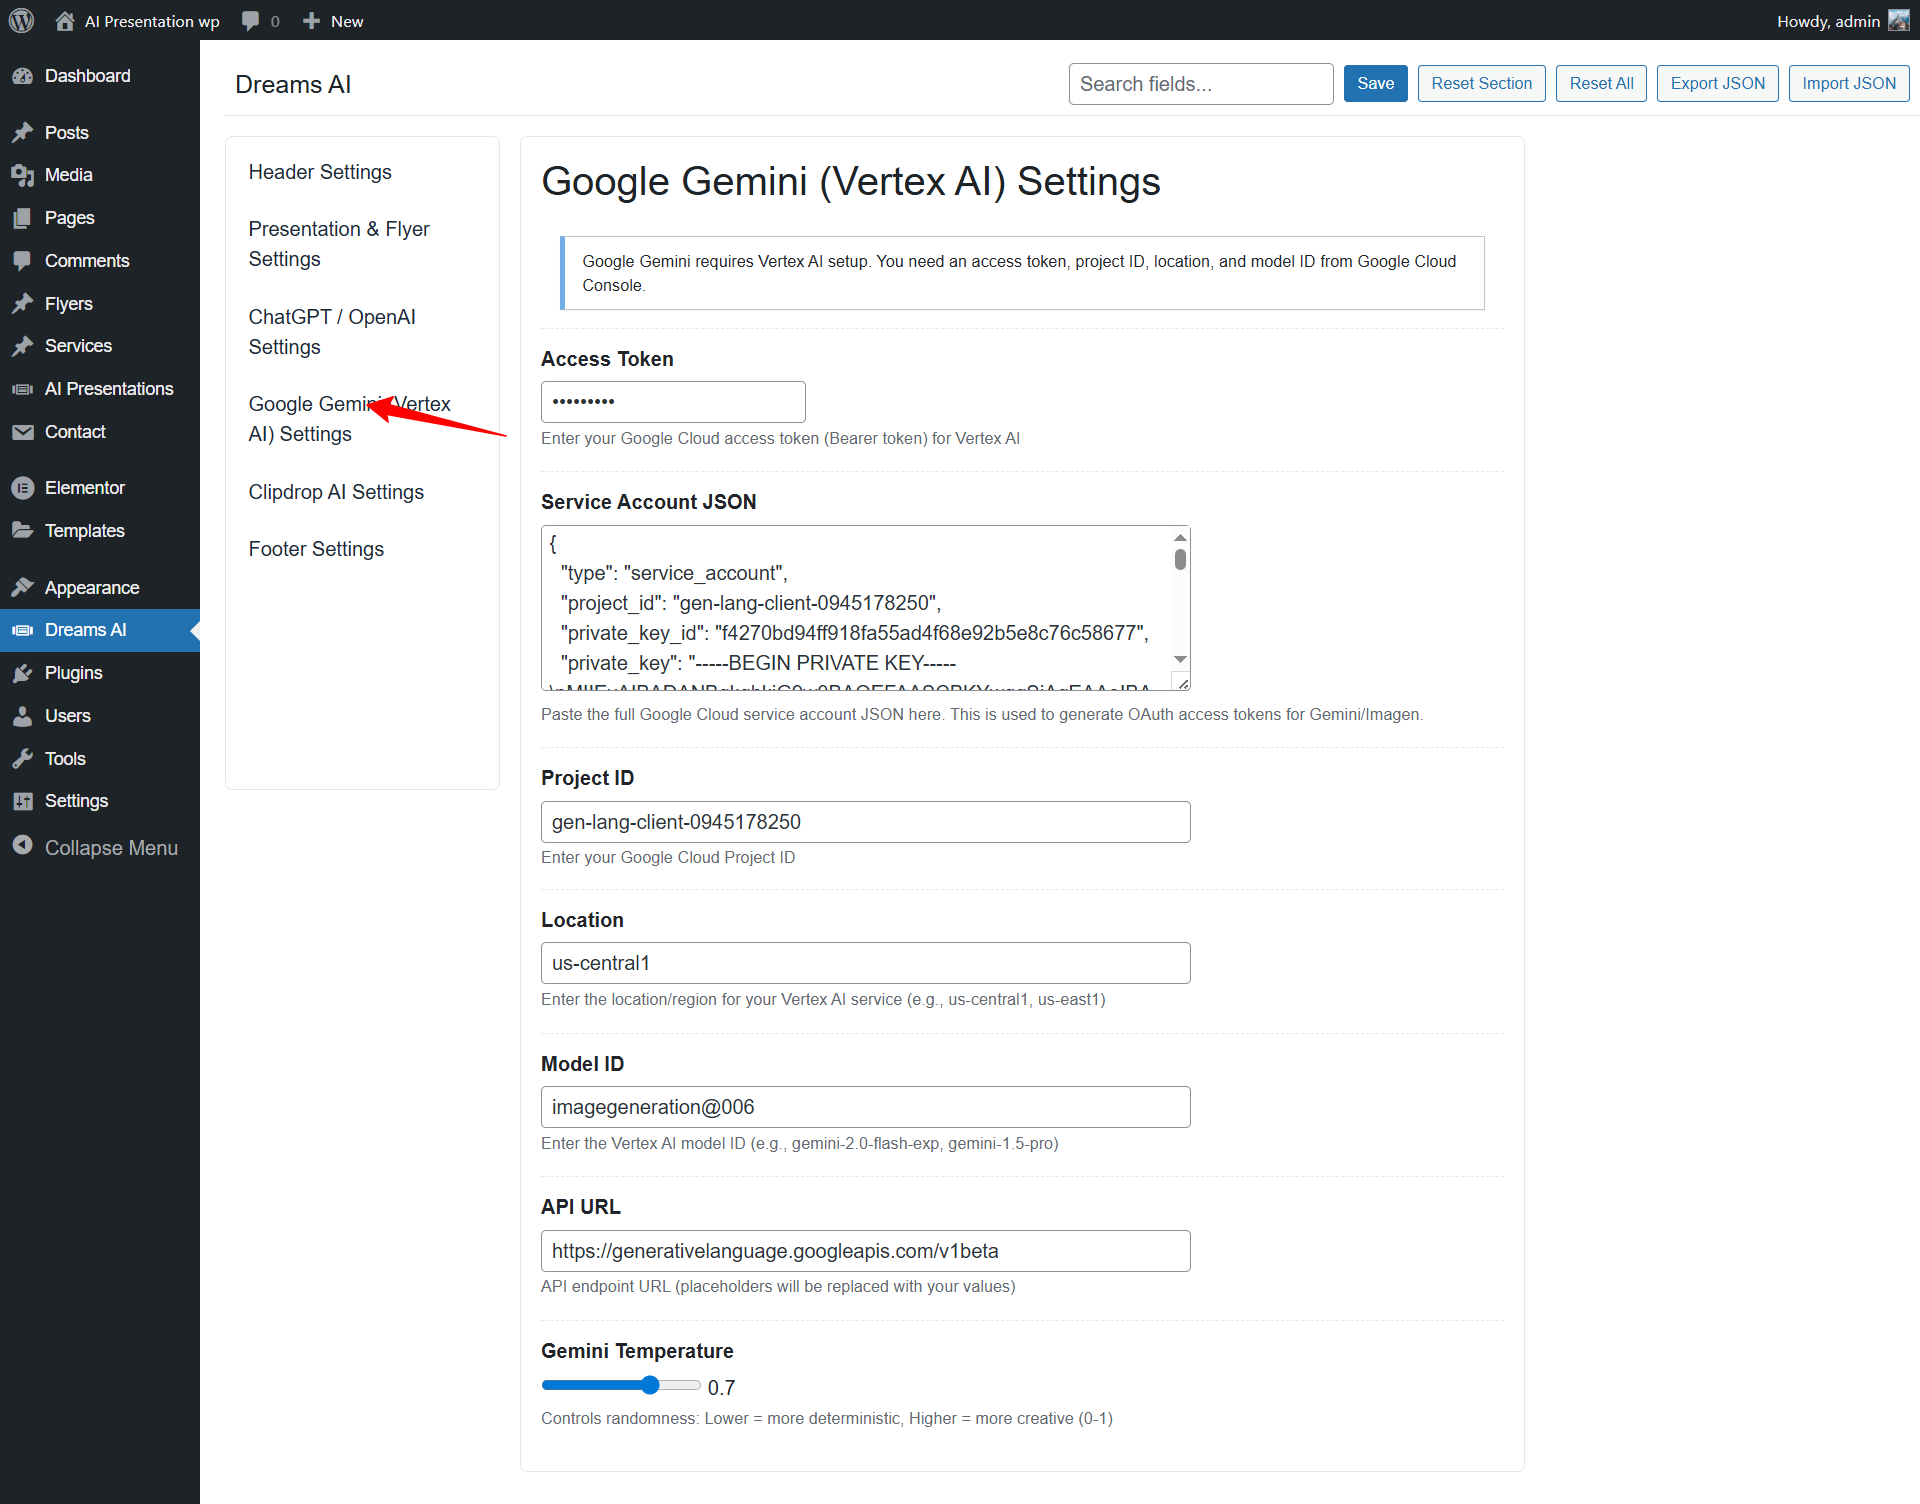
Google Gemini (Vertex AI) Settings
Google Gemini requires a Vertex AI setup — you'll need an access token, project ID, location, and model ID from the Google Cloud Console.
- Access Token: Your Google Cloud access (Bearer) token for Vertex AI.
- Service Account JSON: Paste the full Google Cloud service account JSON here — used to generate OAuth access tokens for Gemini/Imagen.
- Project ID: Your Google Cloud project ID (e.g.
gen-lang-client-0945178250). - Location: The region for your Vertex AI service
(e.g.
us-central1,us-east1). - Model ID: The Vertex AI model ID to use (e.g.
imagegeneration@006,gemini-2.0-flash-exp). - API URL: The API endpoint URL (default:
https://generativelanguage.googleapis.com/v1beta); placeholders in this URL are replaced with your values. - Gemini Temperature: Slider controlling response
randomness — lower is more deterministic, higher is more creative
(range 0–1, default
0.7).
API keys and tokens are sensitive credentials. Never share screenshots of these fields publicly, and rotate any key you suspect may have been exposed.
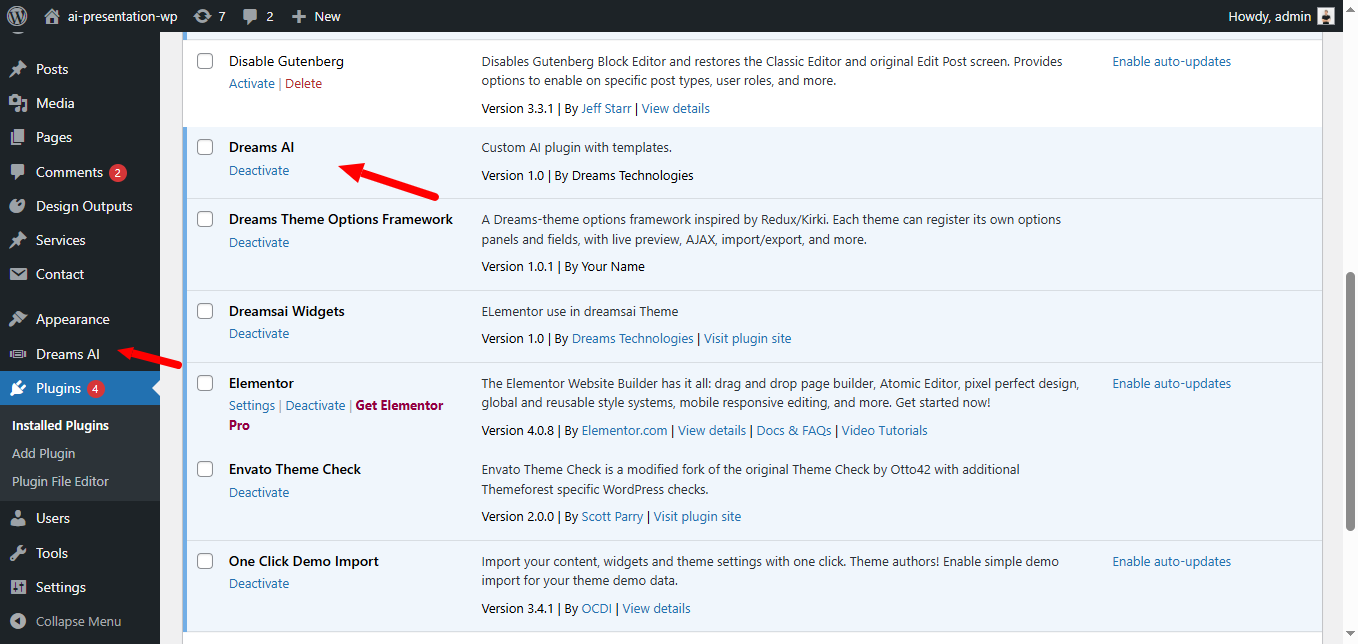
DreamsAI
A custom AI plugin with templates that powers the AI presentation and flyer generation features throughout the theme. It uses a custom canvas Editor to generate flyers and presentations, giving customers and admins a fast, template-driven design workflow.
Dreams Theme Options Framework
A custom-built theme options framework created specifically for DreamsAI. It's lightweight, developer-friendly, and easy to extend — each theme can register its own options panels and fields, with support for live preview, AJAX, and import/export.
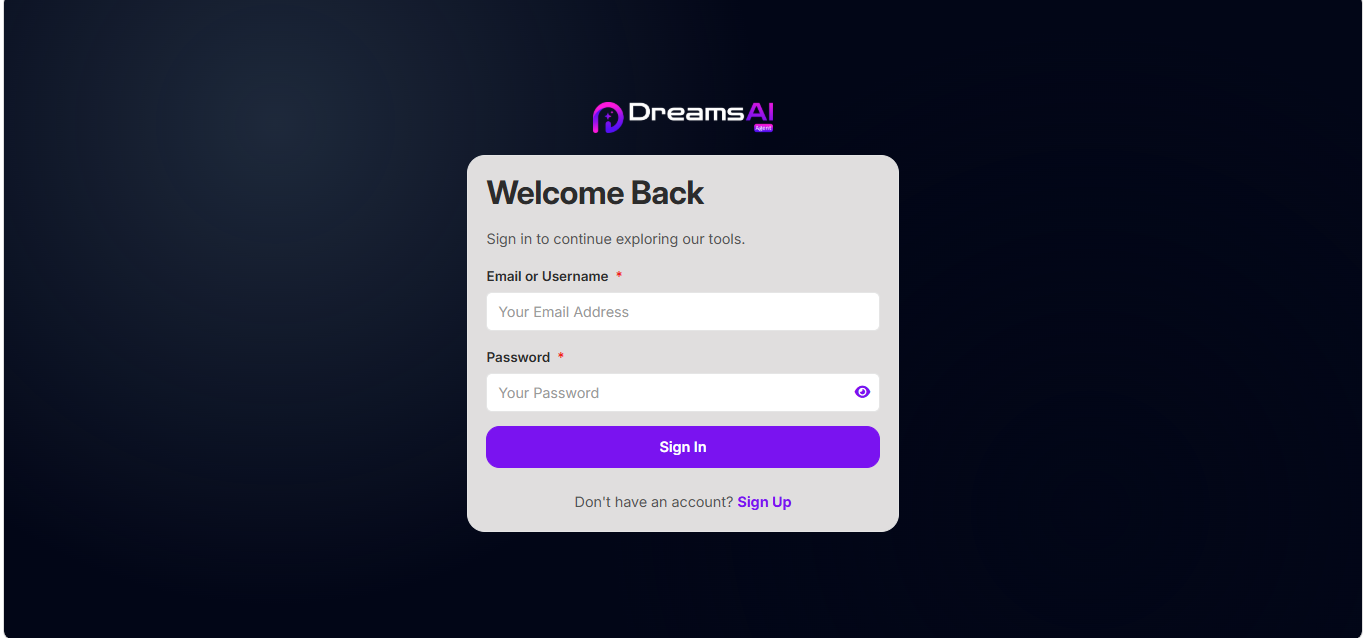
Sign In and Sign Up pages are assigned in Theme Options → Header Settings (see the Login Page and Register Page fields above), and both screens carry the DreamsAI branding automatically.
Customer Sign In
- Email or Username: Accepts either the customer's registered email address or username.
- Password: Includes a show/hide toggle for the entered password.
- A Sign In button submits the form; a "Don't have an account? Sign Up" link routes new customers to the Registration page.
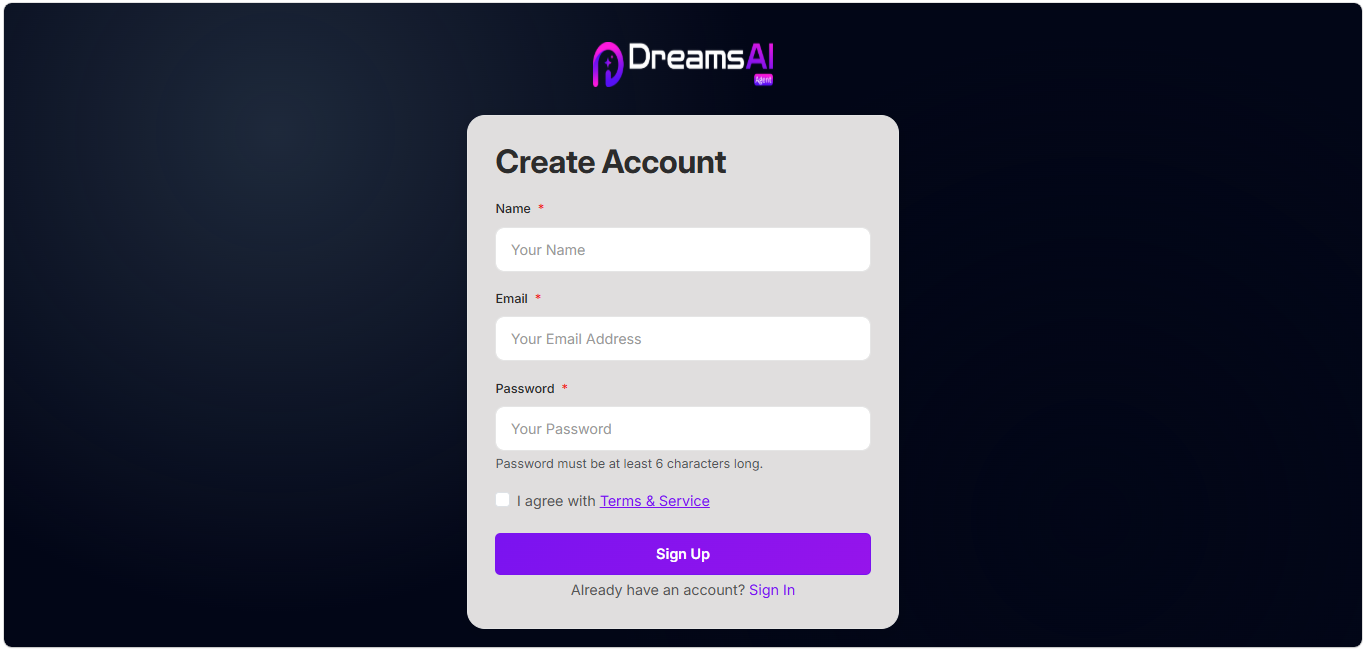
Customer Registration (Create Account)
- Name: Customer's full name.
- Email: Used as the account login and for notifications.
- Password: Must be at least 6 characters long.
- I agree with Terms & Service: Required checkbox linking to the page assigned under Terms & Conditions Page in Header Settings.
- A Sign Up button submits the form; an "Already have an account? Sign In" link routes back to the login page.
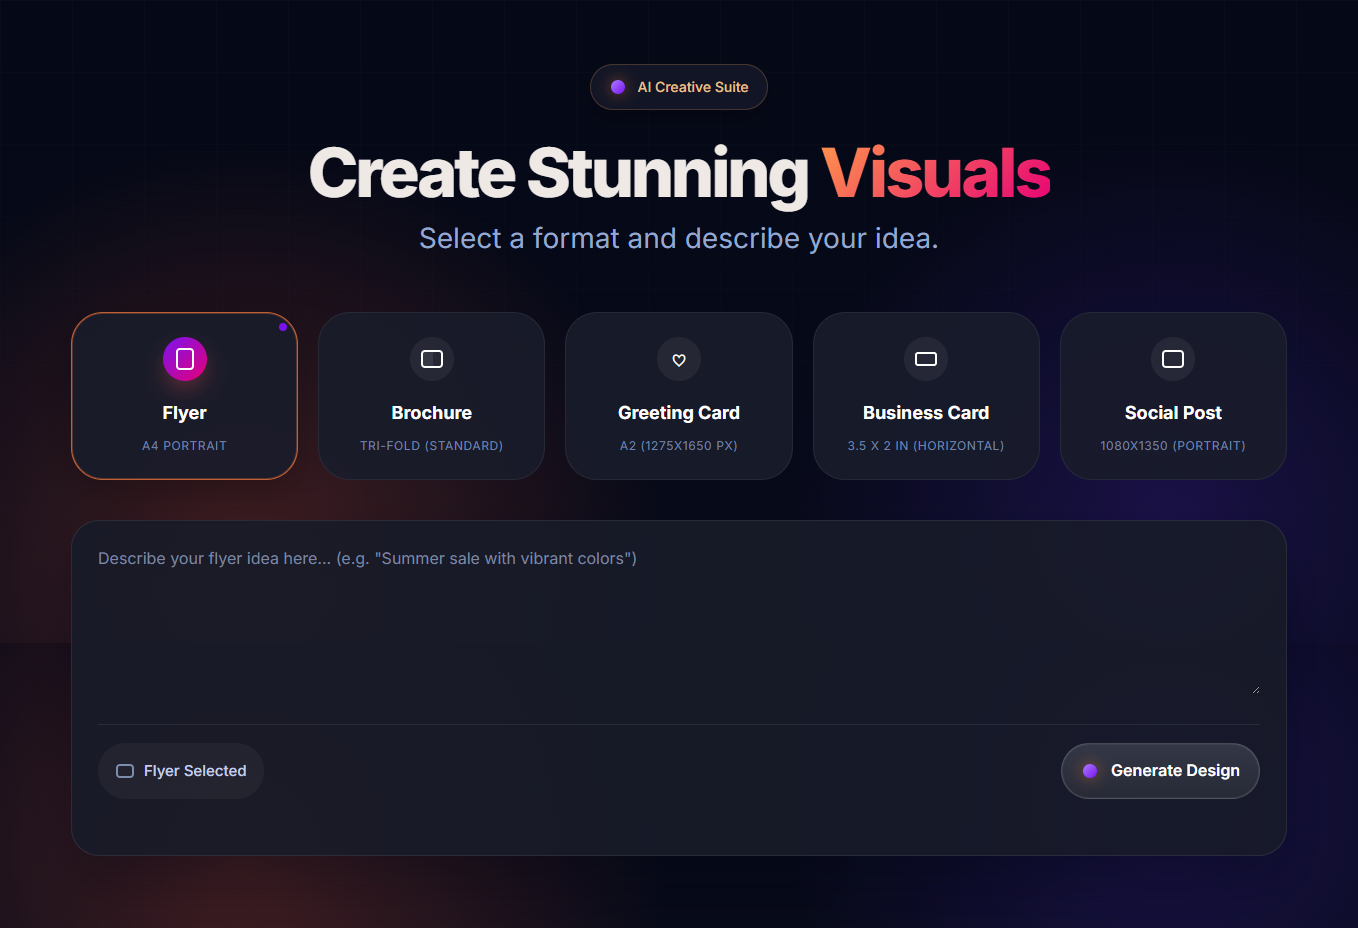
We can create a flyer by clicking Creating Flyer under the Generator section in the menubar. The AI Creative Suite opens with a format picker followed by a description field.
- Format selection: Choose the visual you want to generate — Flyer (A4 Portrait), Brochure (Tri-fold, Standard), Greeting Card (A2, 1275×1650px), Business Card (3.5×2 in, Horizontal), or Social Post (1080×1350px, Portrait).
- Description field: Describe the idea in plain language (e.g. "Summer sale with vibrant colors") — the Content and Image AI services configured in Theme Options generate the design from this brief.
- Generate Design: Click to send the brief to the AI Flyer Generator and open the result in the Design Studio canvas editor for further editing.
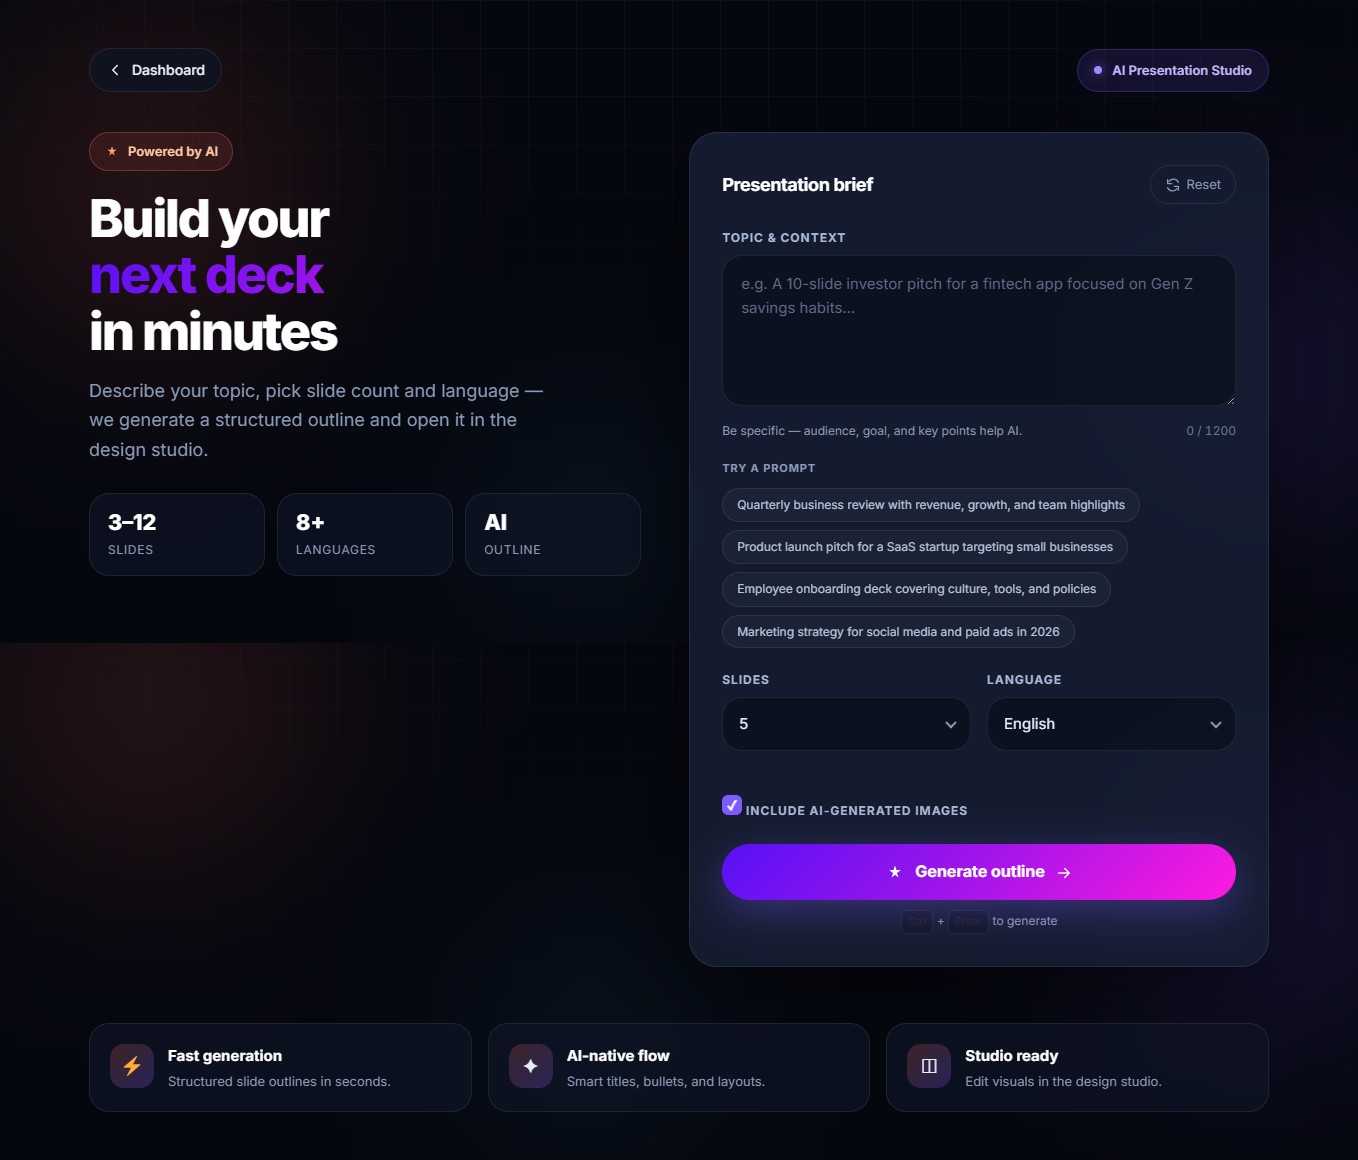
We can create an AI Presentation by clicking Ai Presentation under the Generator section in the menubar. This opens the AI Presentation Studio, where a Presentation brief panel collects the details needed to generate a structured outline.
- Topic & Context: Describe the presentation — audience, goal, and key points (up to 1200 characters). A set of "Try a prompt" suggestions is provided for inspiration, e.g. "Quarterly business review with revenue, growth, and team highlights" or "Product launch pitch for a SaaS startup targeting small businesses."
- Slides: Dropdown to choose the number of slides to generate (3–12, capped by the Maximum Slides value set in Theme Options).
- Language: Dropdown to choose the output language (8+ languages supported, defaulting to the Default Language set in Theme Options).
- Include AI-Generated Images: Checkbox to enable automatic slide imagery, mirroring the theme option of the same name.
- Generate Outline: Click (or press Ctrl/Cmd + Enter) to generate a structured slide outline, which then opens directly in the Design Studio for visual editing.
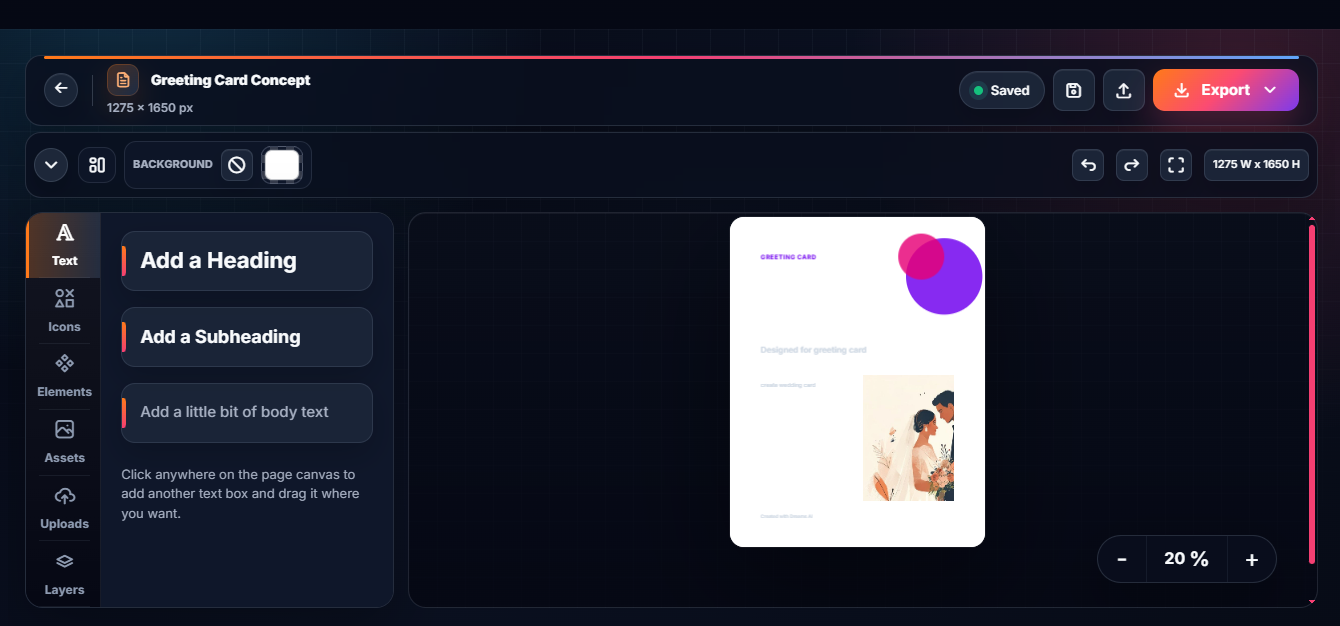
Every generated flyer or presentation slide opens in the Design Studio canvas editor, which can also be launched directly to build a design from scratch.
- Left tool panel: Switch between Text, Icons, Elements, Assets, Uploads, and Layers to add or manage content on the canvas.
- Text tool: One-click buttons to Add a Heading, Add a Subheading, or Add a little bit of body text; clicking anywhere on the canvas also drops a new text box at that position.
- Top toolbar: Toggle a background color,
undo/redo changes, expand to full screen, and see the exact
canvas dimensions (e.g.
1275 W x 1650 H). - Save / Export: The project auto-saves (shown by the Saved indicator) and can be exported once ready.
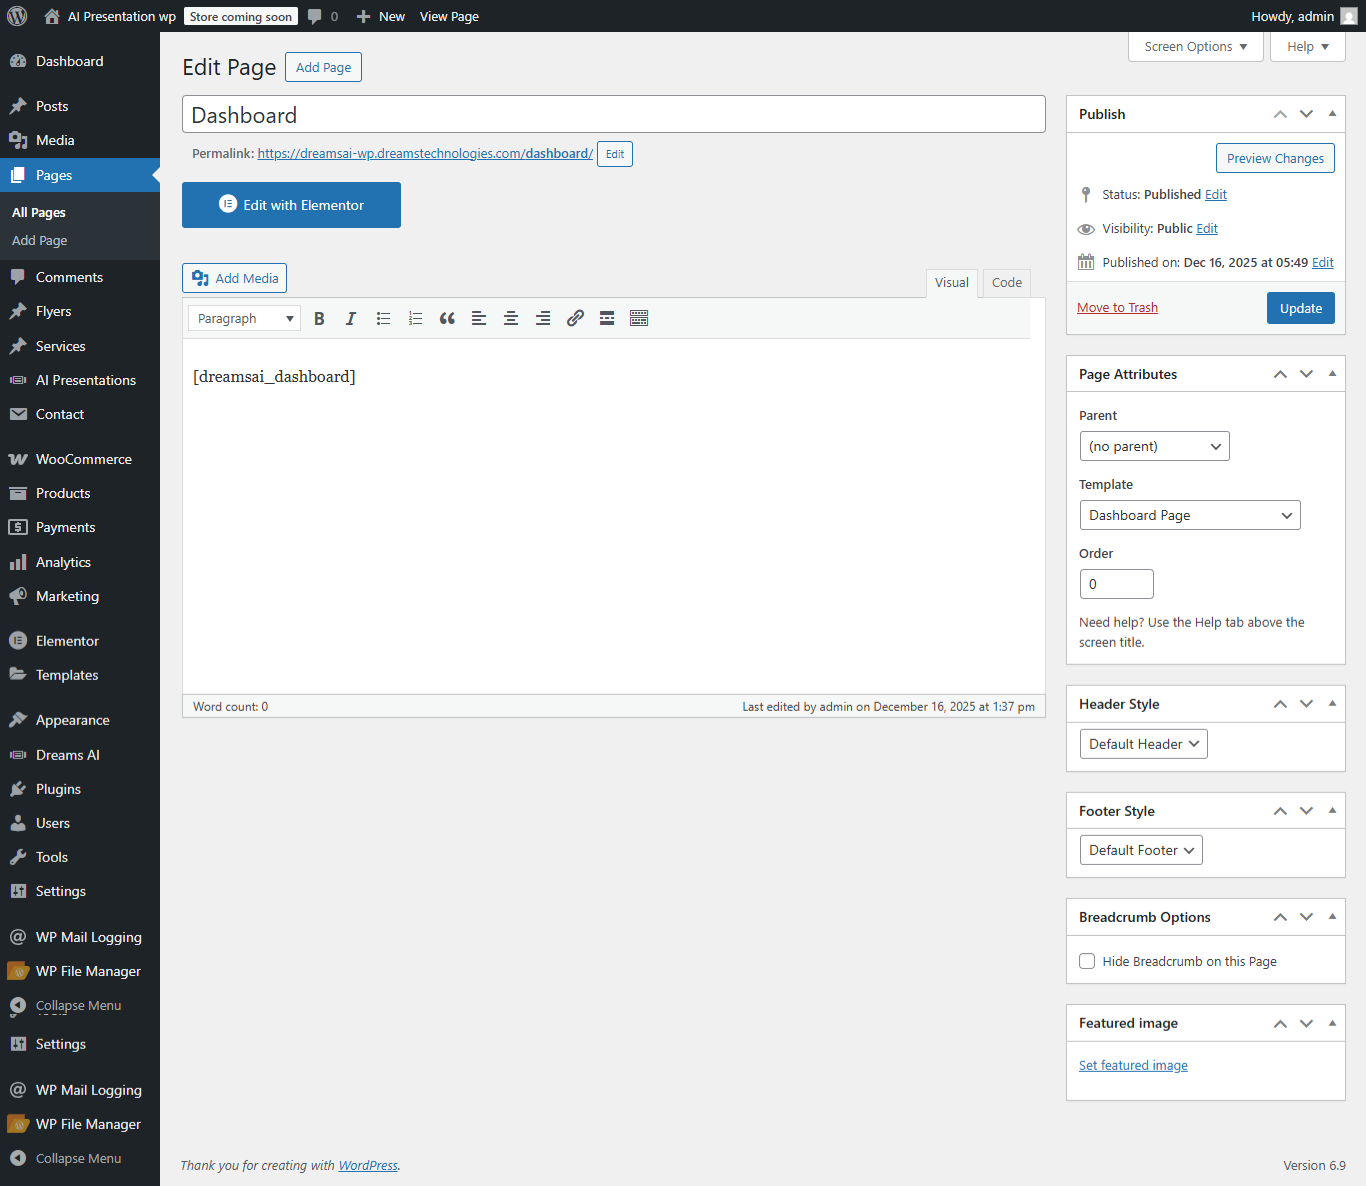
Create a page for the Dashboard, add the
[dreamsai_dashboard]
shortcode to the page content, save the page, then assign it as the
Dashboard Page under Theme Options → Header
Settings. The page can use the dedicated Dashboard
Page template, as shown below.
Admin Dashboard
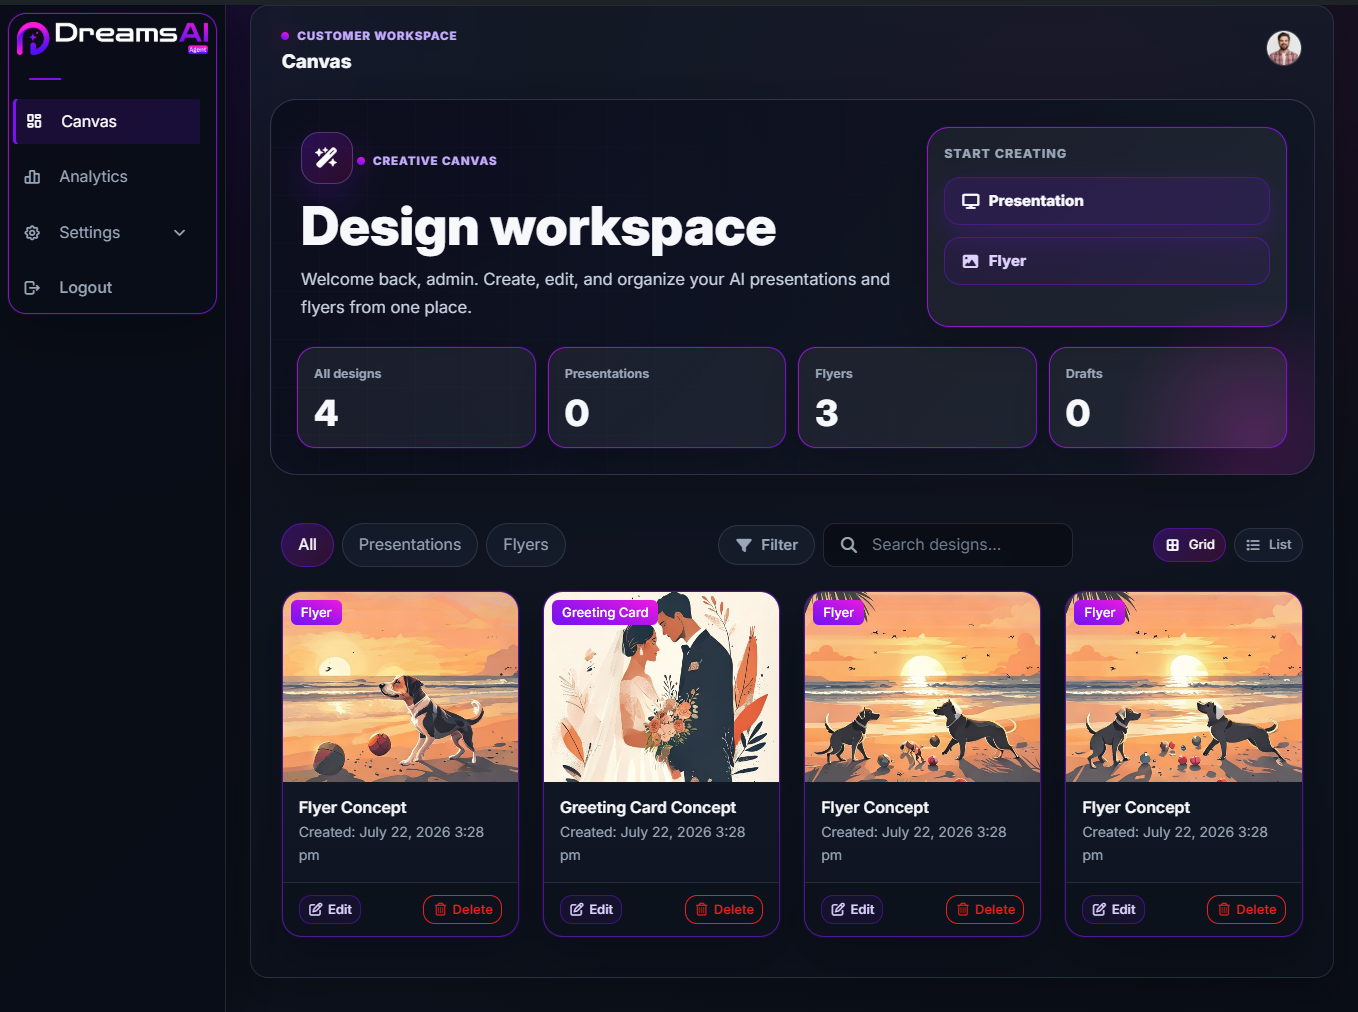
The Admin Dashboard gives workspace admins a central view for reviewing customer designs. It surfaces total designs, presentations, flyers, and items pending review, and includes a quick review coverage panel showing how many customers are active in the workspace. Admins can filter and search through submitted designs, and open any item to review or edit it directly.
Customer Dashboard
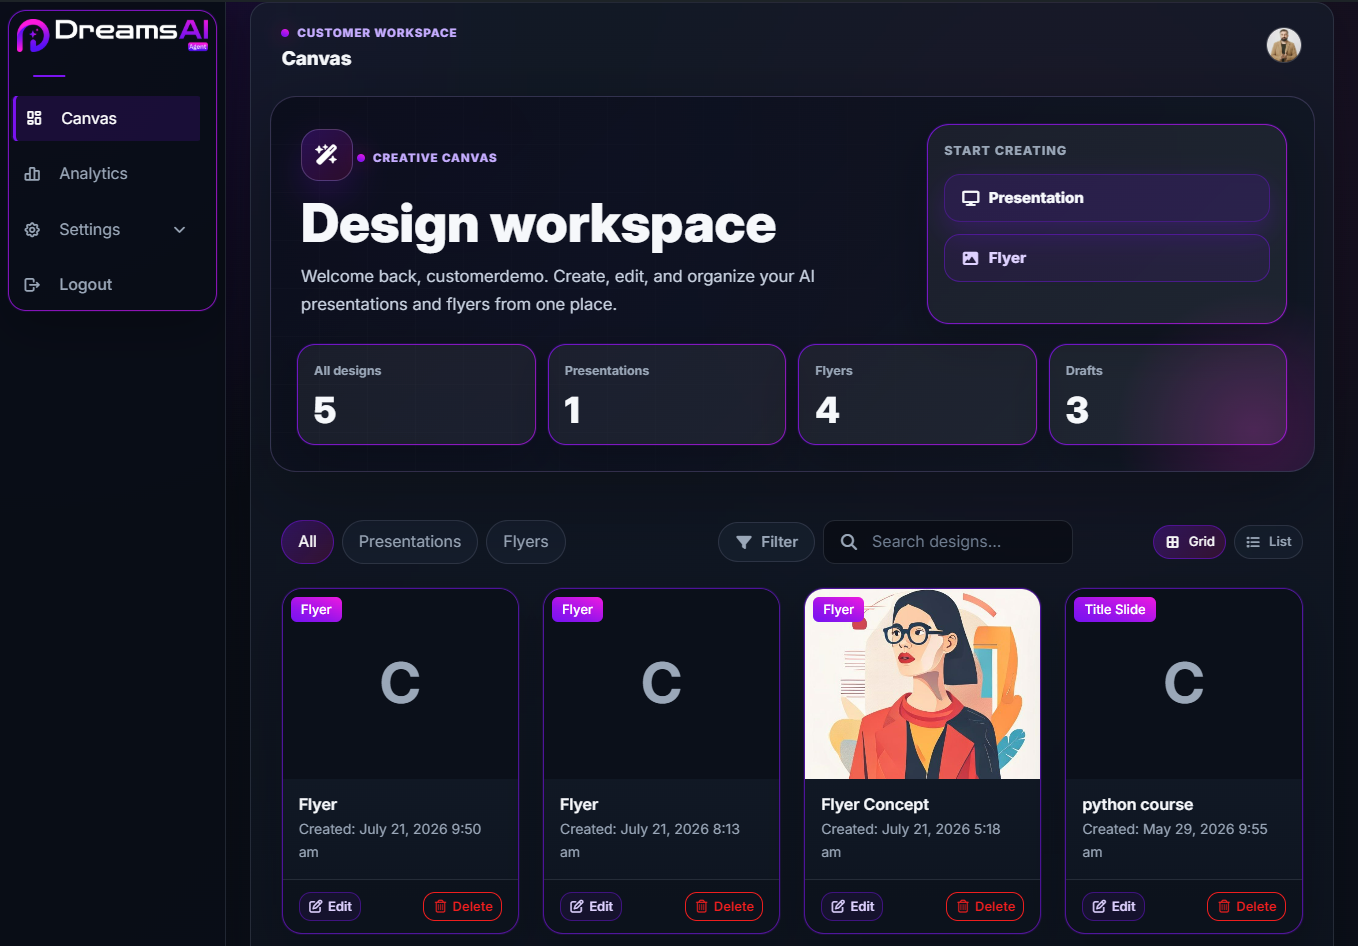
The Customer Dashboard is the design workspace customers land on after logging in. It shows their total designs, presentations, flyers, and drafts at a glance, with quick-start actions for creating a new presentation or flyer. Below, customers can browse, filter, and search all their existing designs, and edit or share each one directly from the grid.
1. Demo content import fails or times out
This is almost always a server resource limitation. Try the following:
- Add
define( 'WP_MEMORY_LIMIT', '512M' );to yourwp-config.phpbefore the line "That's all, stop editing!". - Ask your host to increase
max_execution_timeto 300 andupload_max_filesizeto 256M. - Ensure all 7 required plugins are installed and activated before running the import.
- Re-run the import from Appearance → Import Demo Data.
- If images are missing after import, go to Tools → Import → WordPress and re-run the WordPress importer choosing to download and import attachments.
2. Booking confirmation emails are not being sent
WordPress uses PHP's mail() function by default, which many hosts
block. To
fix this:
- Install a free SMTP plugin such as href="https://wordpress.org/plugins/wp-mail-smtp/" target="_blank">WP Mail SMTP.
- Configure it with your email provider's SMTP credentials (Gmail, SendGrid, Mailgun, etc.).
- Use the plugin's Test Email feature to confirm delivery.
- Check your spam folder — some hosts deliver to spam before SMTP is configured.
3. Payment is not processing / WooCommerce errors
- Confirm WooCommerce is installed and active (version 8.0 or higher).
- Go to WooCommerce → Settings → Payments and ensure at least one payment gateway is enabled and configured.
- If using Stripe, ensure your API keys are entered and the gateway is set to Live mode (not Test) for real transactions.
- Check WooCommerce → Status → Logs for error messages related to payment failures.
4. Booking or Dashboard pages return a 404 error
This is almost always a permalink issue. Fix it by:
- Going to Settings → Permalinks in WordPress Admin.
- Without changing any settings, click Save Changes. This flushes the rewrite rules.
- If the issue persists, confirm the correct page is assigned under Appearance → Theme Options → Service.
5. PHP memory or white screen errors
- Add
define( 'WP_DEBUG', true );anddefine( 'WP_DEBUG_LOG', true );towp-config.phpto enable logging. Check the log atwp-content/debug.log. - Increase PHP memory: add
define( 'WP_MEMORY_LIMIT', '512M' );towp-config.php. - Deactivate all non-DreamsAI plugins one by one to check for plugin conflicts.
- Switch temporarily to a default WordPress theme (e.g., Twenty Twenty-Four) to rule out theme-level conflicts.
6. Elementor icons not rendering correctly after demo import
Go to Elementor → Settings → Features Tab → Inline Font Icons and change the setting from DEFAULT to INACTIVE. This must be done after every demo import.
DreamsAI is developed by href="https://themeforest.net/user/dreamstechnologies/portfolio" target="_blank" rel="noopener">Dreams Technologies and is available under both Envato Extended & Regular License options.
Regular License
Usage by either yourself or a single client is permitted for a single end product, provided that end users are not subject to any charges.
Extended License
For use by you or one client in a single end product for which end users may be charged.
What are the main differences between the Regular License and the Extended License?
If you operate as a freelancer or agency, you have the option to acquire the Extended License, which permits you to utilize the item across multiple projects on behalf of your clients.
| Plugin Name | URL |
|---|---|
| Bootstrap | https://getbootstrap.com/docs/ |
| jQuery | https://jquery.com/ |
| Fontawesome | https://fontawesome.com/ |
| Select2 | https://github.com/select2/select2 |
| Date Timepicker | https://cdnjs.com/libraries/jquery-datetimepicker |
| Google Fonts | https://fonts.google.com/ |
| Fabric JS | http://fabricjs.com/ |
Need Support?
If this documentation does not address your questions, please feel free to contact us via email at support@dreamstechnologies.com
Reach the team at GMT+5:30. Typical reply within 12–24 hours on weekdays — rarely up to 48 hrs during holidays. Support is available to verified buyers for template-related issues.
Contact Supportimportant Note : We strive to offer top-notch support, but it's only available to verified buyers and for template-related issues such as bugs and errors. Custom changes and third-party module setups are not covered.
Do you need a customized application for your business?
If you need a customized application for your business depends on your specific requirements and goals, Please contact us. Customization can be the key to success, ensuring your project perfectly aligns with your unique goals and requirements.
Don't Miss Out on the Benefits of Customization!
Unlock the potential of your project. It's time to ensure your project isn't another cookie-cutter solution but truly unique and effective one.
Discover how customization can make a difference in your project's success. Let's create a solution that's as unique as your vision!
We'll tailor the application to meet your specific needs and preferences.
We will upload your website to the server and ensure it is live.

Thank You
Thank you once again for downloading DreamsAI.
We hope you're enjoying your experience, and we kindly request that you take a
moment to share your valuable review and rating with us.